 The summer time heat is really starting to show its head here in MA! We have the hot, humid and sticky weather which is followed by afternoon/evening thunderstorms. Every year it is the same, we complain about the cold weather and then complain about the heat.
Well today we are going to beat the heat with a cool summer time treat!! Lets go make some Ice Cream folks! This is going to take a bit of reading and you may have to review the steps a few times. I'll do my best to keep it all simple and easy. If you have any questions, feel free to reach out to me over on Facebook by clicking on this link.
The history surrounding our delicious subject today is almost as wild as the combinations of flavors you can find. Stories of Marco Polo bringing ice cream back to Europe from China along with King Charles I inventing the frozen treat are just that...fun, but still stories without any evidence to support the claims. There is evidence of an ice cream like creation in 618 AD from China and later on in historical texts from India, which detailed the mixing of salt and ice to help "freeze" cow or goats' milk. In the early 1500's the trick of freezing products with a mixture of ice and salt appeared in Italy and another 150 years would pass before the chemists of that day and age began to create frozen foods. These early mixtures became known as Sorbets all across Europe. In 1664 Naples, people began to see ices mixed with sweetened milk and from then on Ice Cream became a true national treasure.
Ice Cream was so popular that the creation of the tasty dessert was a deeply held secret. Common people only knew stories of its existence. One such story told about a feast by Charles II, in which the royal table alone was allowed the honor of being served. The rest of the party goers could only watch as the table ate.
These days we all have access to ice cream from many different sources and also in an infinite amount of flavors. There is hardly a simple chocolate or vanilla out in the market today, rather we are now forced to choose between 15-20 different types of chocolate alone!
It is so much a part of our daily lives that the entire month of July is known as National Ice Cream Month and the third Sunday of July is National Ice Cream Day (for all of you who don't have a calendar in front of you, that date is July 20th). Check out some of these great ice cream facts before we continue and learn about how to make ice cream at home...
Chocolate Syrup is the number one ice Cream topping in the US.
*
In 2002 the CBS television news show, Early Show, aired a segment where Carvel Ice Cream created the worlds largest ice cream scoop pyramid. It was made in under an hour and contained over 3800 individual scoops.
*
The largest ice cream sundae was made in Alberta Canada by Palm Dairies and it weighed around 55,00 pounds
*
American favorite Ben and Jerry's was started in an old converted garage up in Vermont
*On average, the US consumes about 20 quarts of ice cream per person each year
Fun, interesting and just plain wow! Lets get down to business and see how you can make this good stuff at home.
Many people would love to make ice cream at home and once you get the hang of it, you are only limited to what your imagination says when it comes to flavor. What holds back many of us though is the thought of "not having an ice cream making machine"...I did a bunch of research on this, especially considering that the modern version of the ice cream machine hasn't really been around all that long. Years ago it was made with ice, salt, and lots of muscle to keep it mixed correctly. If you have a pair of glass bowls, an electric hand mixer and some patience...then you can make ice cream anytime you want!
 Cookies & Cream Ice Cream, Made Without An Ice Cream Machine
1 Cup Milk
1 Cup Sugar
1 Cup Half & Half
1 Tbs Vanilla Extract
1/4 tsp Salt
2 Cups Whipping Cream2 Cups Crushed Oreo Cookies
You begin the whole process by scalding the milk in a small sauce pot. Scalding is done by heating the milk over a low/medium heat until it begins to gently simmer with small bubbles forming around the edge. Remove from the heat.
Add in the salt and sugar immediately, stir gently until both are dissolved. Once completed add in the half and half along with the vanilla extract and whipping cream. Pour the mixture into a glass bowl and allow to cool. Cover with plastic wrap and place in the refrigerator overnight. This process allows flavors to combine and helps to create a smoother product.

Now for the freezing process. Remove your bowl from the refrigerator and stir the mixture thoroughly. A wooden spoon or firm rubber spatula will work best for these next steps. Cover the bowl with fresh plastic wrap or an appropriate cover. Place it in the freezer for two hours. While you're waiting, take and crumble your 2 cups of cookies. Set them aside for a bit later.
Remove the bowl from the freezer and use the electric hand mixer to whip the mixture. Always start with a lower setting to avoid a mess. Beat the mixture for about 30 seconds to a minute. You are looking to just mix up any ice that may be forming. Cover again and place it back into the freezer for an additional 2 hours. Repeat the same whipping process. At this point the ice cream is still going to be soft and may need additional time to freeze to a loose ice cream consistency, think melted but not soup here! Check every 30 to 45 minutes until you get to this point. Then use the spatula or spoon to stir in the cookie pieces. Take the mixture and pack it into a plastic, Tupperware style container with a lid. Leave room at the top to allow the mixture a place to expand to. If you don't give it a little breathing room, the resulting mess is not much fun to clean up. I speak from experience here!
Place the container into the freezer to allow it time to properly set itself up. Give it at least a couple of more hours and you should be good to go. The actual time will vary depending on the ingredients you choose.
When you feel comfortable with your ice cream making skills. Feel free to substitute the traditional dairy products for ones lower in fat or even swapping in coconut or almond based milk products. If you need to be lactose free, you can substitute for that as well. Just remember to follow the steps and adjust the timing if needed to suit your needs.
The secret to adding in ingredients for texture and flavor comes later in the whole process, by folding in your extra goodies you retain consistency and enhance the overall final batch. This basic, vanilla style base goes perfectly with pretty much everything. You can always change your base flavor by removing the vanilla extract and stirring in flavored berry sauces towards the end. This process makes for great Blueberry or Strawberry Ice Cream. You can even use coffee beans in your base mix to make a delicious Coffee Ice Cream. Check out these next few recipes for ideas on how to flavor a special treat just for yourself. Follow the same instructions for freezing using the hand mixer and enjoy! It takes some patience, but the results are well worth it.
Lets see about getting back to those recipes I promised!!
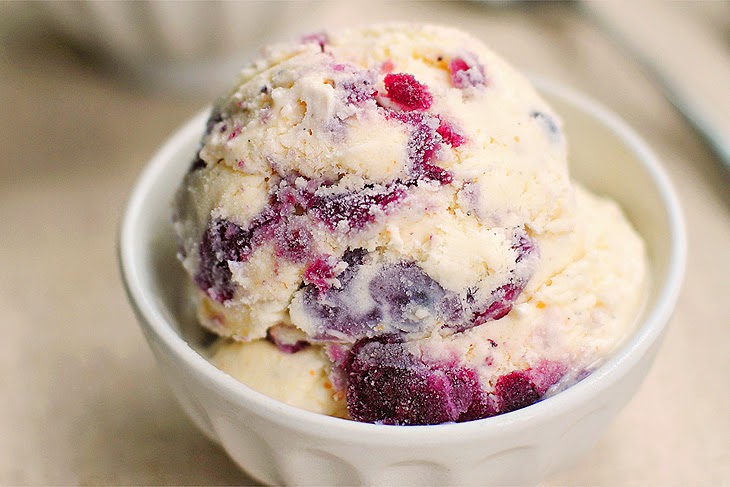
Black Raspberry Ice Cream
2 Cups Fresh Blackberries
1/4 Cup Sugar
1 Each Whole Lemon
Simple and easy recipe to make some amazing ice cream. Follow the base directions for the ice cream making above. Once you have placed the mixture into the freezer for the first time you can get the fruit ready which will be added, in place of the cookie pieces. Squeeze the juice of the lemon into a small sauce pot. Be careful to remove any seeds. Add in the raspberries and stir over low/medium heat. Pour the sugar over the top of the berries and stir until dissolved. Remove from the heat and set aside to cool. Fold this into the ice cream mixture. Be careful to not totally crush the berries. This will give you a great looking marble texture in the finished product. After the berries have been added. Place back into the freezer and wait until it is done freezing. Make sure to follow all of the basic steps that were outlined above.
 Blueberry Ice Cream
2 Cups Fresh Blueberries
2 Tbs Sugar
1 Each Whole Lemon
1/2 to 1 tsp of Cinnamon (optional)
Follow the same exact steps as you would for the Black Raspberry Ice Cream. In this case if you are using the cinnamon, add it into the pot at the same time as the sugar. Feeling a little adventurous? pick up some lavender and sprinkle it into the ice cream at the same time as the blueberries.
Strawberry Ice Cream
2 Cups Strawberries, tops removed and chopped or quartered
1 Large Orange
2 Tbs Sugar
2 Tbs Balsamic Vinegar
This is a fun one to make as the strawberries will take on an amazing flavor from roasting and the colors really pop. Start by preheating the oven to 375 degrees. While the oven heats up you can begin chopping or quartering your strawberries. Toss the berries with the balsamic vinegar and the juice of the orange. Then place them into an oven safe baking dish, sprinkle with the sugar and place into the oven for about 15 minutes. Allow them to fully cool before folding into your ice cream.
 Caramel Coffee Ice Cream
This recipe is kind of surprising and really made me shake my head with how simple it is. In terms of making something at home this one is a no brain hit!! The original base recipe for making simple ice cream at home uses milk. In this case, you don't buy milk!! You purchase any of the several different varieties of ice coffee that line the shelves of your local store. I have been keeping my eyes open for a sale on the Starbucks variety and plan on picking up the Caramel flavored coffee this week! It is made the same way with substituting the milk for flavored coffee. I would also recommend tossing in some espresso powder...maybe a half to whole teaspoon in the beginning to enhance the coffee flavor. To make it even better, you can buy a small amount of caramel syrup and fold it into that almost finished mixture!!
I'll be posting pictures of my own ice cream adventure this weekend. Still not sure which one to make, but it is going to be fun! Remember the key to making something in YOUR kitchen is letting your imagination and heart run wild. So have fun, be creative with the flavors and play!
See you in the kitchen sometime soon
-Sean
No comments:
Post a Comment